Recovering Deleted or Lost Partitions on Mac: A Comprehensive Guide
Accidentally deleted and lost Volumes/Partitions on Mac can be recovered easily now with Partition Recovery Software. Just download the free edition of the software below and follow few simple instructions to recover your data from deleted, & lost Mac volumes. Try now for free..!
 |
 |
Recover Partition Software
Scan
Select
Recover
 |
Mac Partition Recovery
Experiencing a partition loss on your Mac can be a horrible situation, particularly if important and valuable files were stored in that partition. Luckily, there are reliable solutions available to help you recover lost or deleted partitions on your Mac. In this article, we will provide a comprehensive guide on Mac partition recovery, equipping you with the knowledge and tool necessary to restore your partition and regain access to your precious data.
First let's understand what is Mac partition loss:
Before diving into the recovery process, it's crucial to understand the causes of Mac partition loss. Common factors include accidental deletion, disk formatting, system errors, partition table corruption, or malware attacks. Regardless of the reason behind the partition loss, acting promptly and employing appropriate recovery methods can greatly increase the chances of successfully retrieving your lost partitions and their contents.
1. Use Time Machine Backup
If you have enabled Time Machine on your Mac and regularly backed up your data, you have a convenient option to recover lost partitions. Connect your Time Machine backup disk, launch the Time Machine application, and navigate to the point in time before the partition loss occurred. From there, you can selectively restore the lost partitions or even the entire disk to its previous state.
2. Try with Disk Utility
Disk Utility is a built-in Mac application that can help repair and recover lost or damaged partitions. Follow these steps:
- Launch Disk Utility from the Applications/Utilities folder or by searching in Spotlight.
- Select your Mac's hard drive from the sidebar.
- Click on the First Aid tab and select Run to check for and repair any issues with the drive and its partitions.
- If the Disk Utility detects a lost partition, it may be able to repair it or make it mountable again.
Utilize Reliable Mac Partition Recovery Software
In cases where Time Machine backups are unavailable or Disk Utility fails to recover the lost partition, third-party Mac Partition Recovery software can be highly effective to restore lost partition on Mac. This partition recovery software also supports the recovery of various file formats from the deleted partitions, it can comfortably recover raw pictures from deleted partition along with other music & video file formats. Just download this software and use it to retrieve deleted volumes from Seagate portable hard drive on Mac machines.
![]()
![]()
Step-by-step guide to recover deleted & lost Volume on Mac
Step 1: Double click the desktop icon or select the application from the programs list to launch Mac Data Recovery software. This displays the main window of the software, as shown in Figure a.
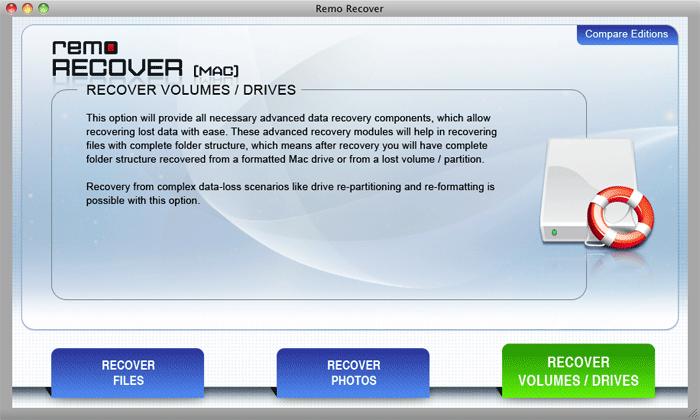
Figure a : Main window
Step 2: The drives and volumes detected by the system get displayed as shown in Figure b. Choose the drive from which the lost volumes have to be recovered, and then click the Recover button.
Figure b : Select Drive
Step 3: Just as you click the Recover button, a new window where the user can select the appropriate option, is displayed, as shown in Figure c. There three options available for the user are,
- Display default volume(s) - The default volumes present on the system are displayed when you select this option. With this, you can recover data from the volumes that already exist on the system.
- Scan for volume(s) - This option can be used to search for lost, missing and corrupted partitions. The software does a scan of the system and displays the lost, missing and corrupted partitions if any..
- Raw Search on Physical Drive (File Recovery) – This option enables you to perform an extensive sector by sector search for lost files.
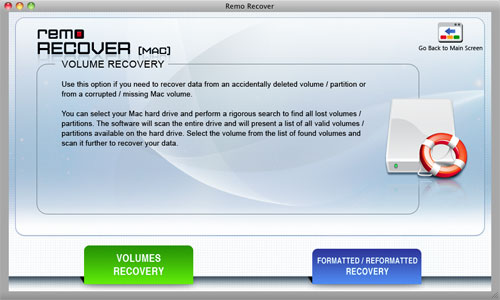
Figure c : Select appropriate option
Step 4: Select the Display default volume(s) option. Clicking the Display default volume(s) button displays the already existing volumes on the selected drive, as shown in Figure d. Select the volume which contains the deleted or lost data, and click the Next button.
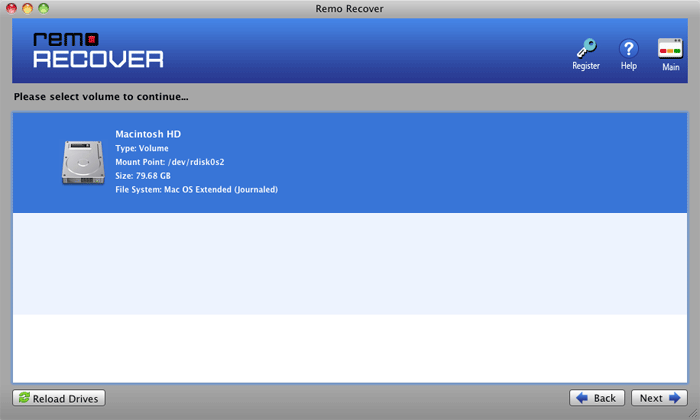
Figure d : Select volume
Step 5: Click on the Next button to select the Scan Method that you want to make use of, as shown in Figure e. You can select from two options.
- Standard Scan- This is a faster and a more time saving scanning process, which can be used, if the corruption in the file system is not severe. We can use this scan method when the logical volume fails to mount.
- Advanced Scan- This is a scanning method that consumes more time, but is more effective than the Standard scan method, since it does an exhaustive search on the selected drive.
Select the Standard Scan option.
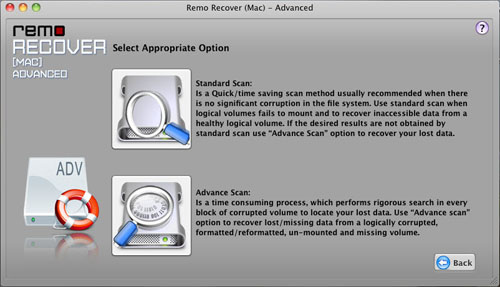
Figure e : Select Scan option
Step 6: The software starts to scan the selected drive as soon as you click the Standard Scan option. The software searches the drive for the lost data, and lists all the found files and folders, as shown in Figure f.
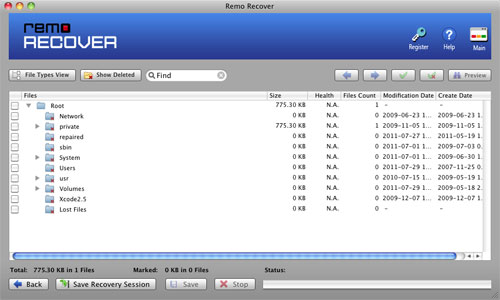
Figure f : Found files and folders
Step 7: Once the files get listed in the tree format, the next immediate step is to select a safe location where the recovered data can be saved. If you want to save all the listed files, click on the Root folder or specifically select the files you want to save, and click the Save button.
A window to choose the destination drive is displayed when you click the Save button. Specify the destination drive, where you want to save the data, and click on the Save button.
To save the data that you have selected onto the selected destination drive, click on the Save button. The data gets saved immediately. The saved data can now be accessed as before.
![]()
![]()